July 23rd 2018 08:00:42am
Update 6/12/2020: The project file for this is now free.
Update: Cinema4D R20 and X-Particles 4 version 742 breaks the xpFlowField readability of this spline setup. The project file and this tutorial still works to create the spline source, but requires extra manual steps to get it working with xpFlowField.
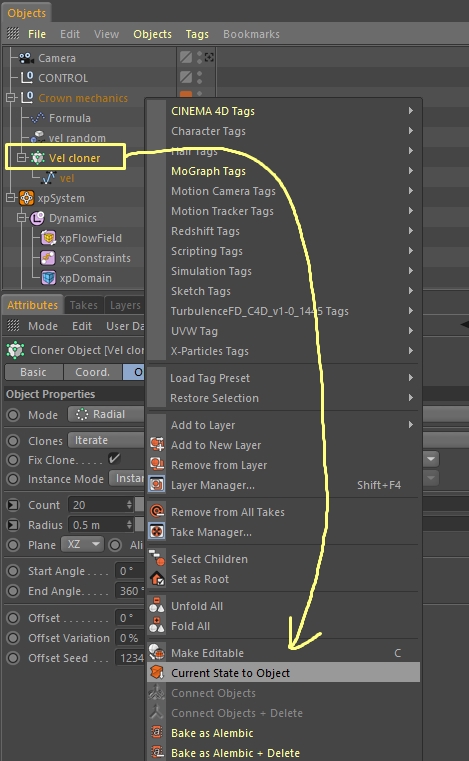
1) Right click on the “Vel Cloner” object and baked it by selecting Current State to Object from popup menu.
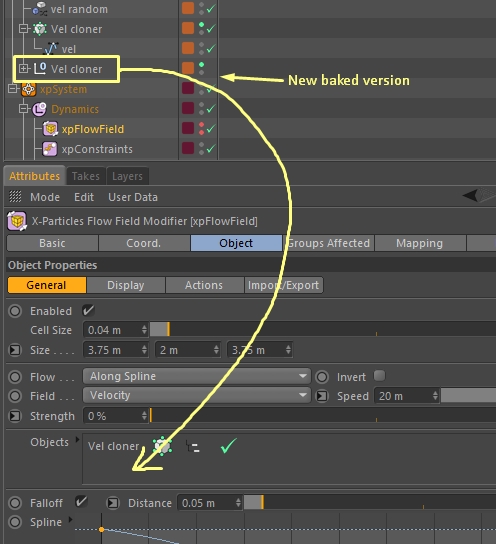
2) Drag the newly baked object in the xpFlowField “Objects” list.
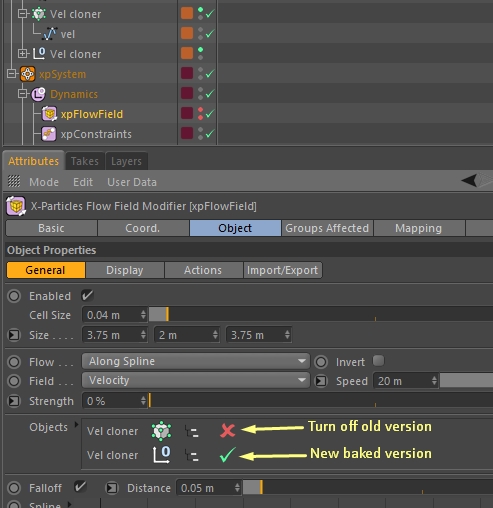
3) Finally turn off the old object in the list by clicking the green check mark. It should have a red X now.
I am currently trying to find a better solution. Insydium has a better native solution at this point with xpSplash object. View more here: xpSplash docs
More X-Particles fun today as we dive into making a crown splash. For years I have been trying to generate a crown splash with X-Particles. Usually it would end up becoming this large build that involved lots of tiny emitters to emulate the streams shooting out from below the surface of the water sim.
It wasn’t until about a year ago that I saw Hernan Llano‘s Houdini multi part tutorial about vectors. This sparked an idea to try an emulate this in Cinema4D. I dove straight into Xpresso and started seeing what I could come up with. After many attempts and failures, I simply gave up on it and moved onto other work. Ping ponging between a variety of projects is quite normal for me. My brain needs to soak up the experience and problem solve it in the background sometimes.
It wasn’t until about three months later that Indysium X-Particles had announced a new feature called xpFlowField. If you are familiar with Houdini, it’s basically a velocity field. A way to introduce motion into your particle or fluid simulation without a pre-roll of any kind. This was a great addition to the X-Particles tool set, and opened up the flood gates for a variety of new ideas, and art direction.
One idea in particular was crown splashes. I was now switching gears back into figuring this out. xpFlowField has a number of options, but one option under the Flow parameter stood out to me called Along Spline. This option forced particles along a spline path, not follow it, but along it. Think of an arrow saying to go left, if particles came close to this arrow, they would be pushed left as long as they were within a threshold distance of the arrow. Kinda like a wind current of sorts.
My initial test was using a circle spline which made a nice whirlpool effect, as seen in this test I had done.
Cool stuff, but I was after a crown splash. The more I played with the options the more I found out there was no specific way to change the direction off of the circle spline to point the way I wanted, which was straight up. I had to think some more on it.
I thought about Hernan’s tutorial some more. He had a spline, and used the points on the spline to create velocity vectors from those to point outwards. I pondered on it a bit, and thought about how xpFlowField was handling the spline. Basically the spline segment WAS the velocity vector, so I decided to treat the spline as such. That is when I had my breakthrough and created this render.
Once I figured out that I could just simply clone a single spline to create my ring, it was only a matter of changing it’s overall angle to replicate what Hernan was doing.